Reyee Wireless PoC Guide V1.0


.Wireless Testing Lists
1.1 Management
1.1.1 eWeb
| Testing project | eWeb |
| Testing purpose | Enable WEB and log into device successfully |
| Testing procedure and expected results |
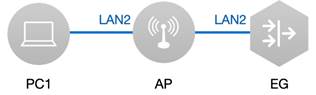
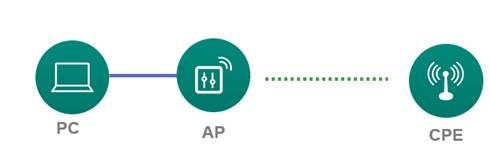
1. Connect PC with Reyee Wireless AP through net cable as shown above. (In this example, port LAN2 is connected)
2, Select DHCP mode on PC to get an IP address. In this example, IP address of PC is 192.168.110.52.
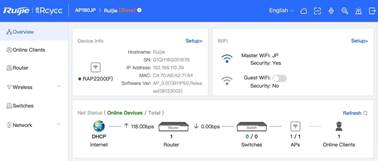
1. Enter the IP of Reyee AP 192.168.110.39 in browser browser must be IE and other major browsers and open compatible mode. 2. Verify Web access. (Expected interface is shown above) |
| Measured record | Login eWeb successfully |
| Testing conclusion | eWeb can be easily opened by simply enter 192.168.110.39 in browser |

1.2 Basic Feature
1.2.1 LAN Port VLAN
| Testing Project | LAN Port VLAN |
| Testing Purpose | Create VLAN via LAN Port |
| Testing procedure and expected results | 1. Power on the Reyee AP, connect AP to the PC1 by net cable
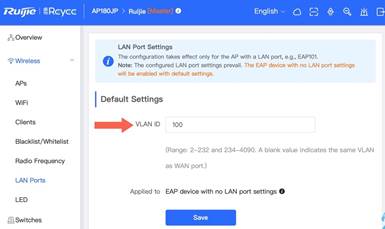
2. In Wireless / LAN Ports tap, enter VLAN ID to set up a new VLAN Then click save button to save the setting. (In this example, VLAN 100 is created).
|
| Measured record | In this example, VLAN 1 and VLAN 2 are created correspondingly |
| Testing conclusion | By taking the advantage of LAN Port VLAN, we can enable multiple virtual local area network easily |

1.2.2 Roaming
| Testing project | Roaming |
| Testing purpose | Test roaming feature between Reyee AP products |
| Testing procedure and expected results |
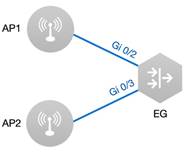
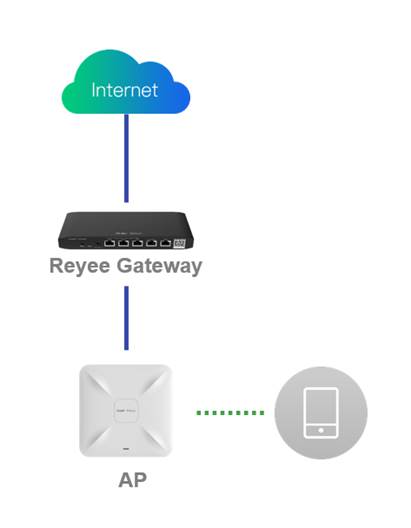
1. Connect two Aps to EG. (In this example, note that AP1 is in one room and AP2 is in another room)
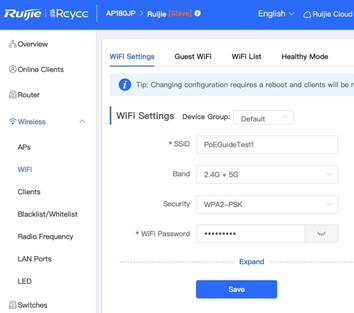
2. Create 1st Wi-Fi from AP1 in Wireless >> WiFi configuration tap as shown below
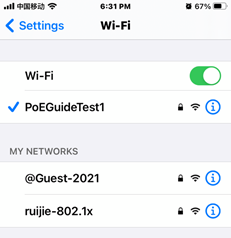
3. Pick a device and connect to the Wi-Fi we created above
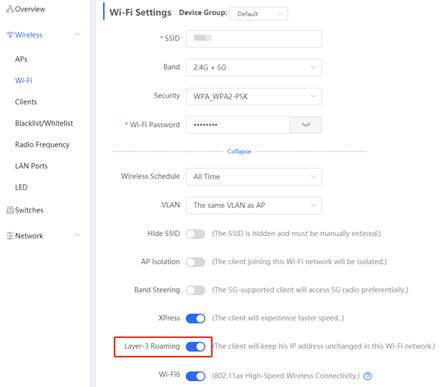
In this example, iPhone is connected to this Wi-Fi. 4. Similarly, create the same Wi-Fi from AP2 in Wireless >> WiFi configuration tap as shown below. If L3 roaming, need enable the L3 roaming button on eWeb
5. Now walk into the room where AP2 placed and connect to the 2nd Wi-Fi we created above. Then walk back to the room where AP1 placed
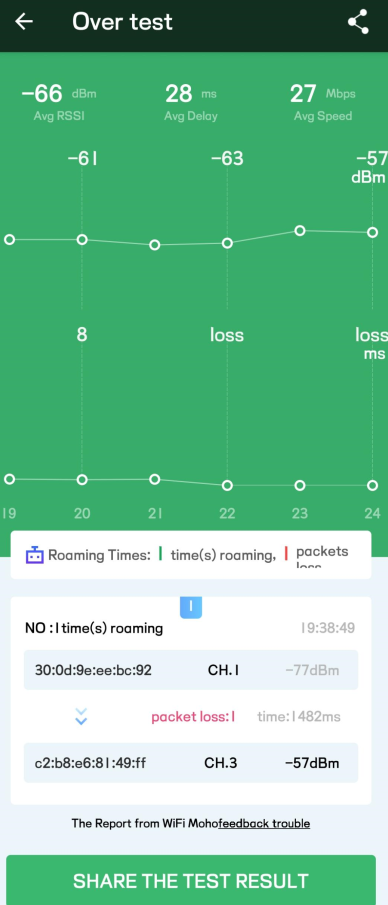
6. Try to use the Wi-Fi MoHo to test the roaming and record the roaming status and the delay
|
| Measured record | When we walk into the area near AP1, the Wi-Fi switches automatically from the 1st Wi-Fi to the 2nd Wi-Fi |
| Testing conclusion | By taking advantage of Roaming feature, the Wi-Fi connected to user’s device can be switched from another adjacent Wi-Fi automatically |
1.2.3 Coverage Test
| Testing project | Coverage of AP | |||||||||||||||||||||||||
| Testing purpose | Test Reyee AP coverage | |||||||||||||||||||||||||
| Testing procedure and expected results |
1. Connect 1 AP to EG
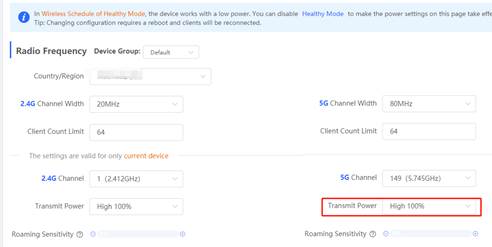
2. Create the SSID on dual-band, configure the AP power to High
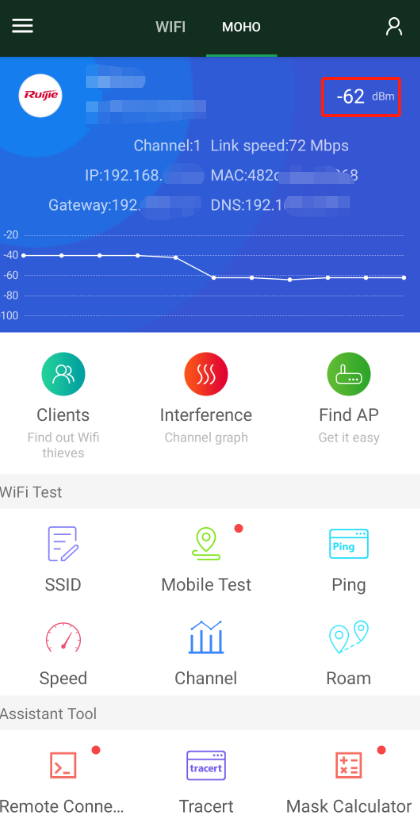
3. Connect to AP with SSID in different distance and obstruct. Test the Rssi with WiFi MoHo and test the throughput with speedtest
| |||||||||||||||||||||||||
| Measured record | Record the 3 times test result
| |||||||||||||||||||||||||
| Testing conclusion |
|

1.2.4 Performance Test
| Testing project | Performance Test | ||||||||||||||||||||
| Testing purpose | The max throughput test | ||||||||||||||||||||
| Testing procedure and expected results |
1. Connect 1 AP to EG
2. Create the WiFi(5G), set the bandwidth to 80 MHz
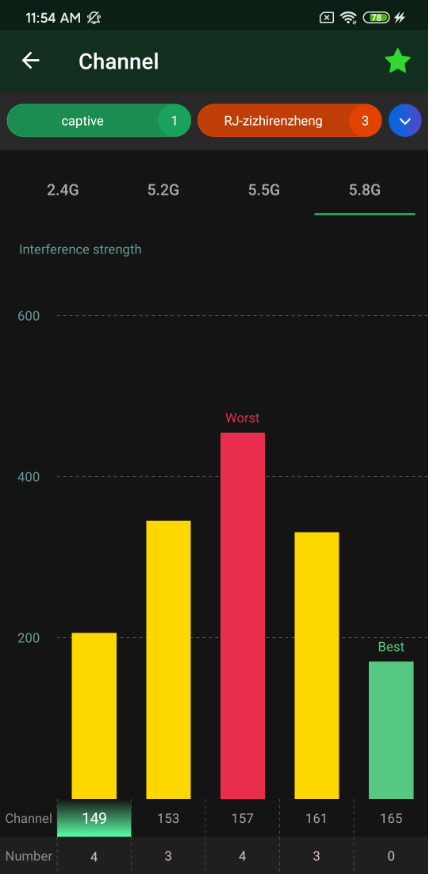
3. Choose the best channel, with the WiFi MoHo
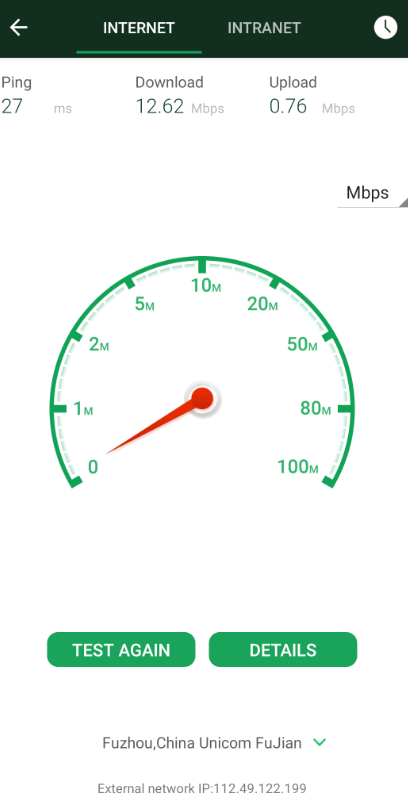
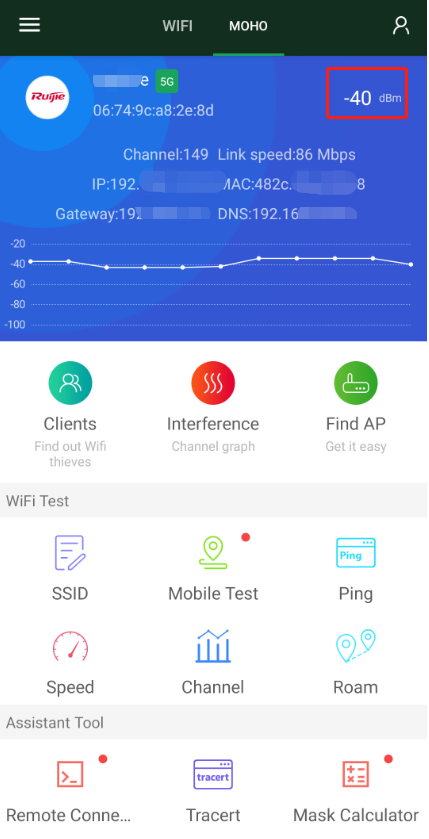
4. Connect the phone to the AP, ensure that the distance between phone and AP is within three meters, check the RSSI on WiFi MoHo (RSSI > -50 is better)
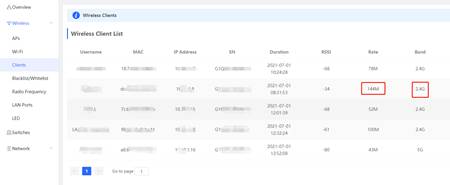
5. Check the link speed on AP, for 5G 11ac the link speed should be negotiated to 866M
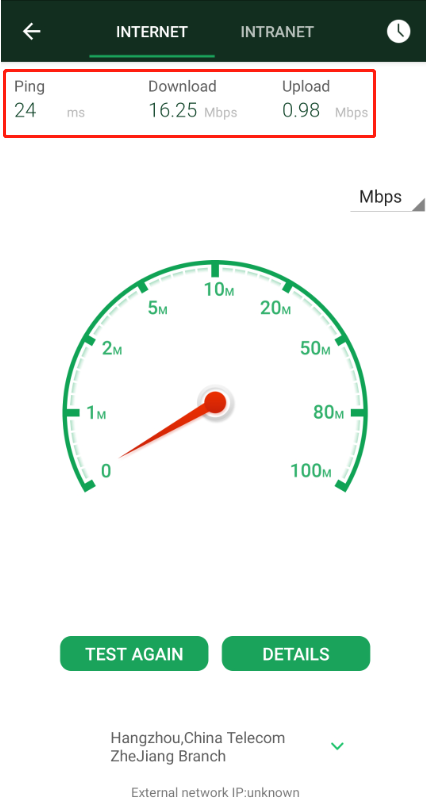
6. Open the speed test, record the test result
| ||||||||||||||||||||
| Measured record |
| ||||||||||||||||||||
| Testing conclusion |
|
1.2.5 Black list / Whitelist
| Testing project | Black list / White list |
| Testing purpose | With Black list / White list feature enabled, users who are about to get access Wi-Fi can be filtered. Test to confirm whether the users who are set in the blacklist (for example) can get access Wi-Fi successfully or not. |
| Testing procedure and expected results |
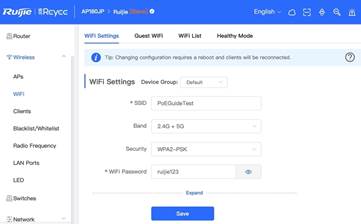
1. Before we do this test we will create a Wi-Fi first from WiFi tap In this example, the SSID PoCGuideTest of WiFi is shown below.
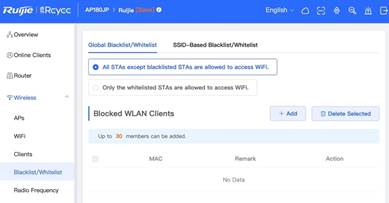
2. Open Black list / White list tap via eWeb
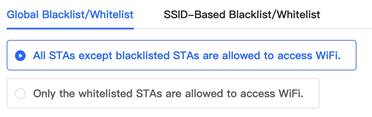
3. Select first one as shown below
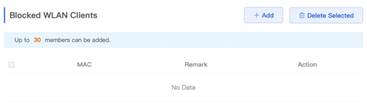
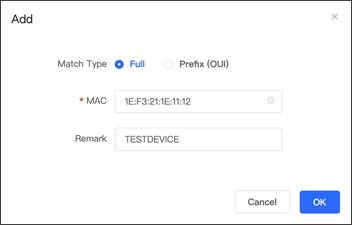
4. Click +Add. Then add the MAC address of the device to the black list then click OK to save the configuration
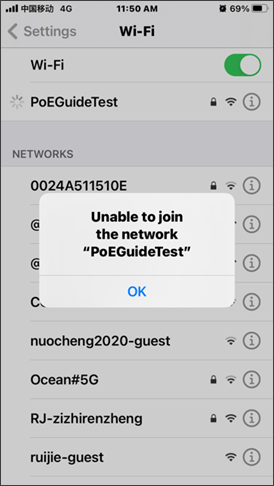
5. Check whether the device added in black list can get access to Wi-Fi generated from this Reyee AP successfully or not In this example, we can see that the Wi-Fi we created earlier does not allow our device in the black list to get access. (As shown below)
|
| Measured record | When the device is added in the black list, the access to Wi-Fi is no longer available. |
| Testing conclusion | By creating the Black list / White list, we can easily manage the clients to get access to Wi-Fi. |

1.2.6 Guest Wi-Fi
| Testing project | Guest Wi-Fi |
| Testing purpose | Set a Guest Wi-Fi to allow guests get access to Wi-Fi temporarily |
| Testing procedure and expected results |
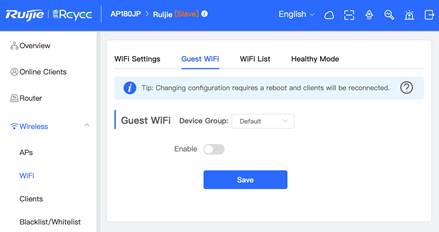
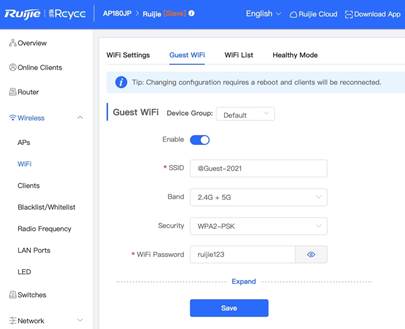
1. Open Guest Wi-Fi configuration from Wireless >> WiFI Menu
2. Enable the Guest Wi-Fi function then enter the SSID of Guest Wi-Fi. The Other settings are optional. Then click Save to create this Guest Wi-Fi In this example, SSID os Guest Wi-Fi is @Guest-2021 as shown below.
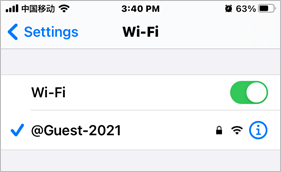
3. Pick a device to connect the Guest Wi-Fi we created above Expected results:
4. Try to ping other users that connect to other SSID |
| Measured record | With Guest Wi-Fi @Guest-2021 created, guests can get access to Guest Wi-Fi successfully. |
| Testing conclusion | Guest Wi-Fi feature on Reyee Wireless brings friendly user experience to guests |
1.2.7 Country Code
| Testing project | Country Code |
| Testing purpose | Check whether options of 5G channel can be automatically matched when we change from one country to another. |
| Testing procedure and expected results |
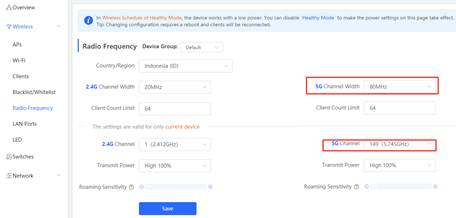
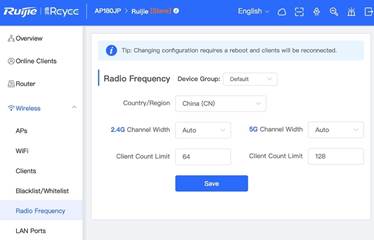
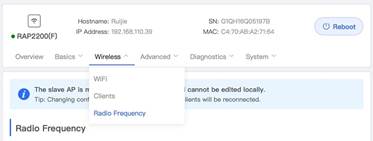
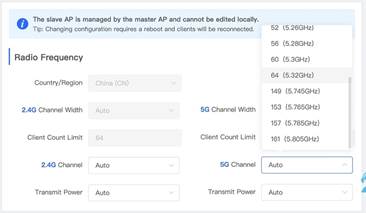
1. In Wireless >> Radio Frequency tap, select China (CN) from Country/Region list, then click Save
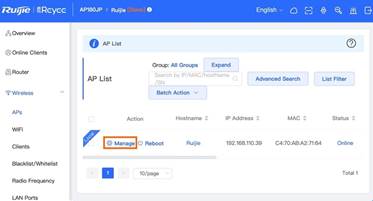
2. In Wireless >> Aps tap, click Manage to open configuration of our Reyee AP
3. Then open Wireless >> Radio Frequency tap
4. Now we can see that the 5G Channel is specifically prepared for China (CN)
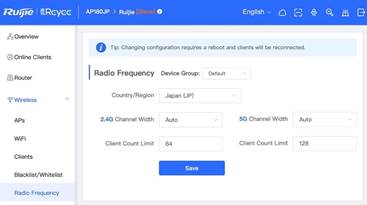
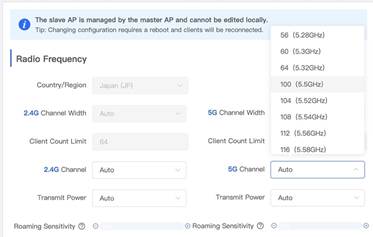
5. Similarly, now we follow the above procedure but change the country code from China (CN) to Japan (JP)
Then we get this
Here we can see that, the option for 5G Channel changes automatically for Japan |
| When we switch country code from China (CN) to Japan, the available options of 5G Channel also changes accordingly. | |
| Testing conclusion | With country code feature built-in, the options of 5G channel can be automatically matched when we change from one country to another. |

1.3Bridge wireless
1.3.1 eWeb
| Testing project | eWeb |
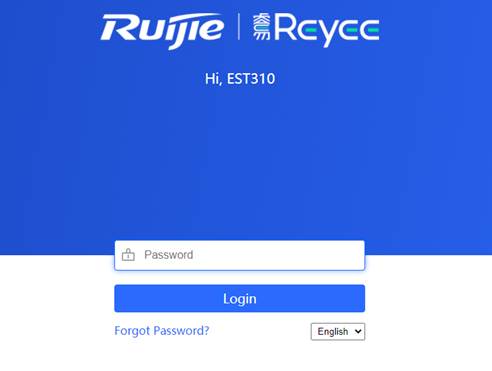
| Testing purpose | Enable WEB and log into EST successfully |
| Testing procedure and expected results |
1. Connect PC with EST through net cable as shown above. (in this example, port Gi0/3 is connected) 2. Assign IP 10.44.77.201/24 to PC 3. Enter the default IP of EST 10.44.77.254 in browser
4.Verify Web access. (Expected interface is shown above) |
| Measured record | Login eWeb successfully |
| Testing conclusion | eWeb can be easily opened by simply enter 10.44.77.254 via browser |
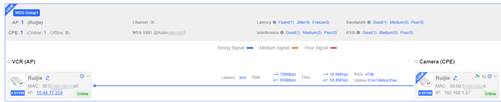
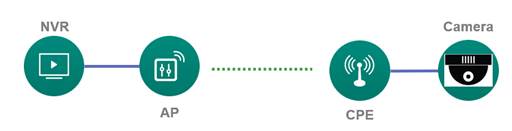
1.3.2 PTP
| Testing Project | Zero Configuration |
| Testing Purpose | EST310 consists 2 devices, and they are paired by default and can be used without requiring any configurations |
| Testing procedure and expected results |
1. Power on the 2 devices 2. Ensure that the distance between 2 devices is within 1KM, If there is interference between two devices, it is recommended to configure distance to 3KM Note: This 3KM is not a physical 3KM distance, and a logical concept. With 3KM configured, EST310 can better bridge
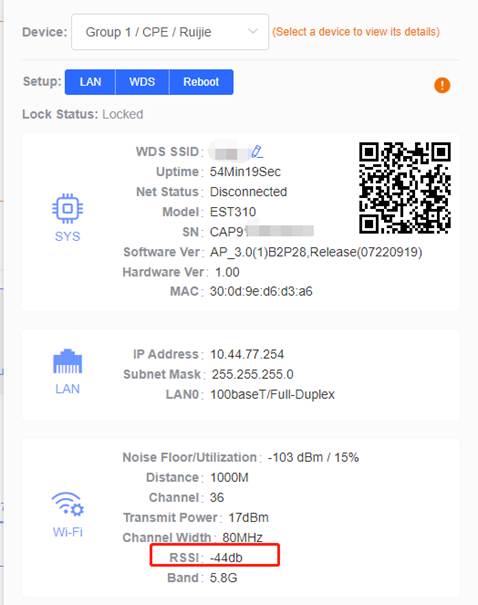
3. Check the RSSI on CPE side
4. It is recommended to select a non-DFS channel (36-48/149-165) to maintain the WDS connection 5. Observe whether the indicator on the device is normal, and log in to the device eWeb to confirm
6. EST uplink connect to the internet and test
|
| Measured record | NVR can collect video information of IP cam normally |
| Testing conclusion | EST310 WDS success automatically |


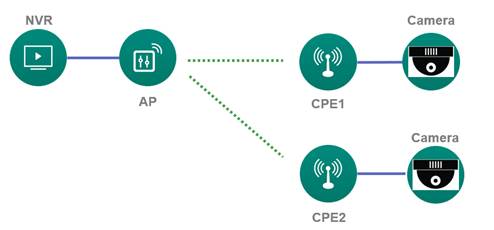
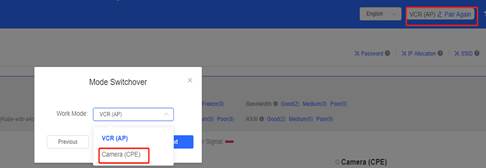
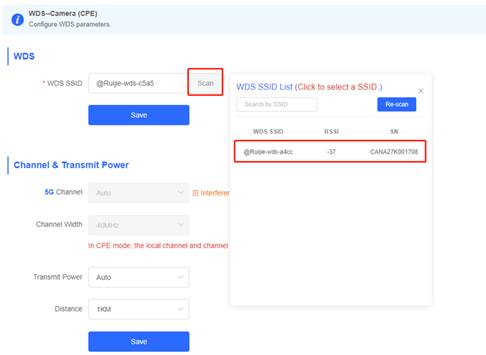
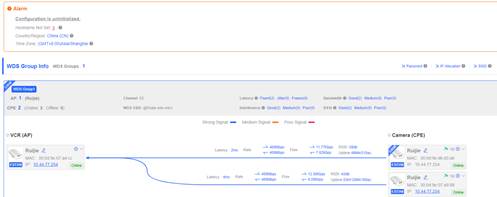
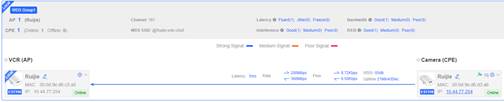
1.3.3 PTMP
| Testing project | PTMP |
| Testing purpose | Support PTMP bridging (1 recorder and multiple cameras) |
| Testing procedure and expected results |
1. Ensure 2 devices have finished PTP bridging
2. Access to anther device, if the device is AP mode, need to switch it to CPE mode
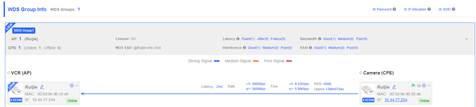
3. Scan the WDS SSID of AP, select and save
4. Then the CPE connect to the AP successfully, check on eWeb
|
| Measured record | NVR can collect all the video information of IP cam that connect to all CPE normally |
| Testing conclusion | EST350 support PTMP |
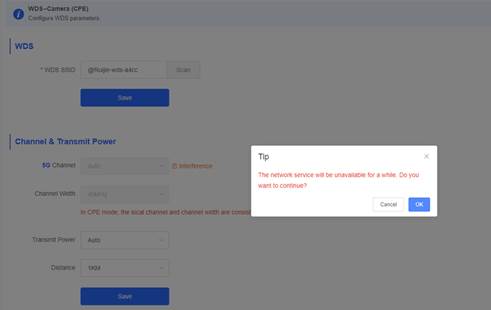
1.3.4 Channeland Width Setting
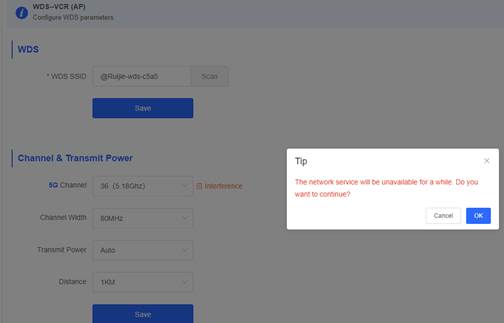
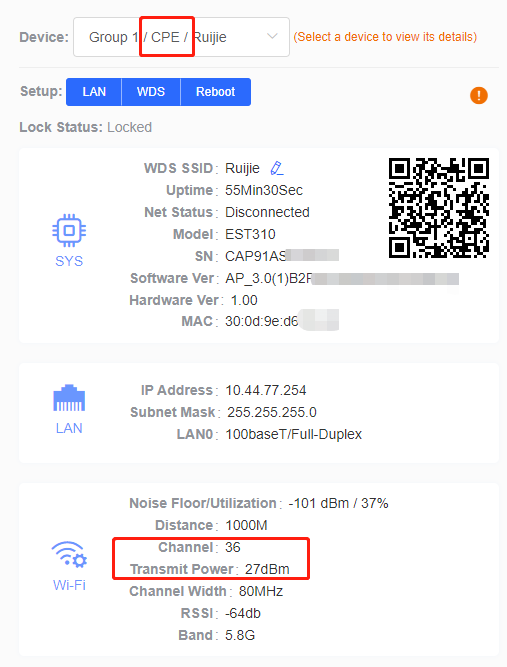
| Testing project | Channel and Width Setting |
| Testing purpose | AP automatically synchronizes channel configuration to CPE |
| Testing procedure and expected results |
1. Ensure 2 devices have finished PTP bridging
2. Change the channel and width on AP device
3. Check the channel on CPE device
|
| Measured record | Try to change the channel on AP device and check whether the CPE device can change automatically or not |
| Testing conclusion | The channel of the CPE device will automatically change with the AP side, and the WDS link will not be impressed |

 Thank you. We will inform you of our response as soon as possible.