Ruijie Cloud PoC Guide (V1.2)


. Test Items Summary
| Category | Test Item | Description | Pass | Fail |
| 1. Mobile App Provisioning | Mobile App Quick Provisioning | AP quick setup via Ruijie Cloud App, and device should online on Cloud |
|
|
| 2. Basic Network Testing | WIFI Configuration | Make AP go online on Ruijie Cloud and broadcast SSID normally. |
|
|
| Rate Limit | Specify whether to enable the rate limit function for a client. | |||
| User Isolation | Clients on the same AP with the same SSID are isolated. |
|
| |
| Whitelist | Websites in the whitelist that can be accessed directly without authentication. |
|
| |
| Layout Planning(Optional) | Layout Planning allows user to import floor plan to Ruijie Cloud and binds AP to specific location as deployment. |
|
| |
| Load Balance (Optional) | Ruijie Cloud load balance feature can dynamic allocate STA to each AP equally in high density scenario. |
|
| |
| RF Setting (Optional) | The RF Setting provides a global setting of wireless country code, bandwidth and intelligent channel/power planning. |
|
| |
| Roaming (Optional) | Ruijie Cloud roaming function allows STA from AP-1 roaming to AP-2 subnet B seamlessly. User can turn on the layer 3 roaming and layer 2 roaming on Roaming page. |
|
| |
| BlueTooth (Optional) | BlueTooth is used for the AP which supports iBeacon feature to broadcast iBeacon signal. |
|
| |
| RIPT (Optional) | If Ruijie Cloud break down, SSID using web authentication will be interrupted and will toggle to Open Authentication automatically by RIPT during disaster. |
|
| |
| The Web Authentication will resume automatically if Public Cloud is reachable again. | ||||
| Network Management (Optional) | Network management, which include Share with network and hand over network. |
|
| |
| AC Management (Optional) | Testing AC management via Ruijie Cloud, which add AC, login to AC eWeb, restart AC, tunnel config, delete AC, display AP and STA list. |
|
| |
| Apartment SSID (Optional) | AP can go online on Ruijie Cloud and broadcast SSID normally. |
|
| |
| 3. Authentication Management Cloud & Access Point) | Account Authentication | Customer can use account to log in by portal WiFi (SSID) |
|
|
|
| One-Click Authentication | Customer can use One-Click Authentication to log in to WiFi network. |
|
|
|
| Facebook Account Authentication | Customer can use Facebook Account to log in to WiFi network. |
|
|
|
| PPSK Authentication | Customer can use PPSK password to log in by portal WiFi (SSID) |
|
|
|
| Voucher Authentication | Customer can use voucher account to log in by portal WiFi (SSID) |
|
|
| 4. Cloud & App Monitoring | Cloud (Web UI) Monitoring | Monitoring device status on Ruijie Cloud WEB |
|
|
| Cloud Monitoring | Monitoring device status Ruijie Cloud. |
|
| |
| Ruijie Cloud App Monitoring | Monitoring device status Ruijie Cloud App (IOS or Android) |
|
| |
| 5. Authentication Acceleration (EG Offload) | Voucher Login with EG local auth | Using Ruijie Cloud created Voucher to log in with Portal WiFi (SSID) |
|
|
|
| Account Login with EG local auth | Account Login with EG local auth |
|
|
|
| One-click login with EG local auth | One-click login with EG local auth |
|
|
|
| Seamless Authentication | User can seamless online directly at next time connected WiFi without login again |
|
|
Note: The addresses & ports to be permittedbefore testing.
| Source IP | Destination IP | Src.port | Dst.port | Protocol | Description | Device using this rule |
| Your network | 35.241.25.95 | Any | 80, 443 | TCP | Ruijie Cloud login server | Browser |
| Your network | 35.197.150.240, 35.234.108.108 | Any | 80, 443 | TCP | Ruijie Cloud server | Browser |
| Your network | 35.197.150.240, 35.234.108.108 | Any | 10000-12000 | TCP | Ruijie Cloud server establishes the tunnel connection with the gateway | Gateway |
| Your network | 35.197.150.240, 35.234.108.108 | Any | 3478, 3479, | UDP | Ruijie Cloud server delivers the CLI commands to the device | AP, Switch, Gateway |
| Your network | 35.190.54.251, 35.186.215.129 | Any | 80, 443 | TCP | Ruijie Cloud authentication server | STA |
| Your network | 35.201.94.110, 35.190.93.193 | Any | 80, 443 | TCP | Ruijie Cloud DNS | AP, Switch, Gateway |
. TestingLists
Preparations:
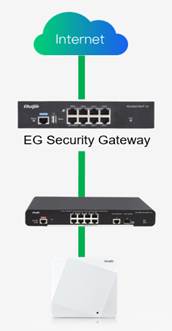
Hardware Requirement: 1 Access Point, 1 PoE switch and 1 EG are required;
Software Requirement: Request to upgrade the access point and EG to the latest version asper recommended in https://www.ruijienetworks.com/support/documents/slide_73633.
Tool: Wi-FiMoho is required to download on your terminal in advance.
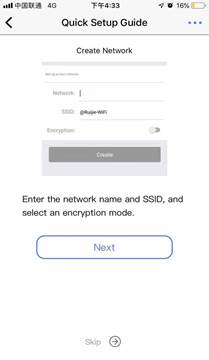
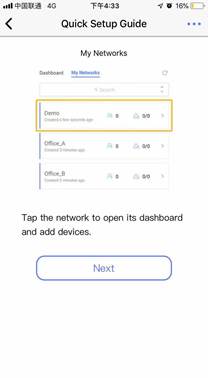
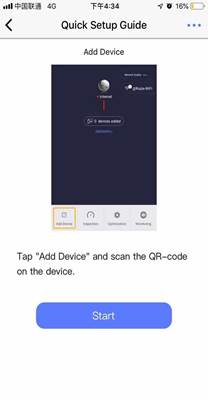
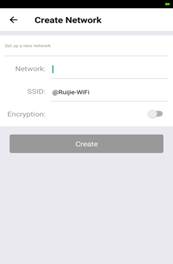
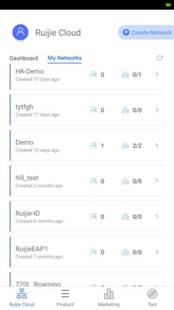
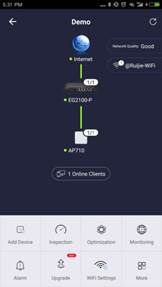
2.1 Mobile App Quick Provisioning
| Testing Project | APP dummy provisioning |
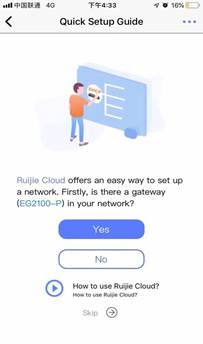
| Testing Purpose | Ruijie Cloud App provides a quick start to Create Network and Add Device. |
| Testing procedure and expected results: | 1. Power on the AP, and make sure it is able to access the Internet.
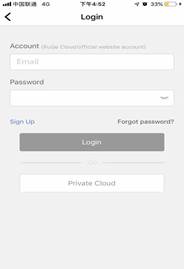
2. Login to Ruijie Cloud via Ruijie Cloud APP
3. Choose Project, click “Quick Start”, and follow the wizard to create Network to add a new network group.
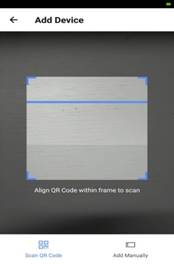
4. Click Start, and set the network SSID. After the network is created, then enter the network and click Add Device to add AP and EG2100-P through scanning the QR code (AP SN/MAC) on the back of the device.
|
| Measured record: | |
| Testing conclusion: |
|
2.2 Basic Network Testing (Cloud & AccessPoint & Wireless Controller)
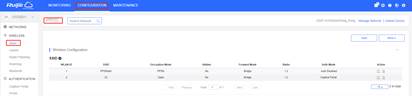
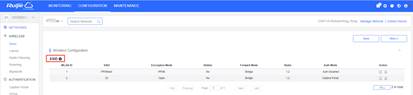
2.2.1 WIFI Configuration
| Testing project: | WIFI Configuration |
| Testing purpose: | AP can go online on Ruijie Cloud and broadcast SSID normally. |
| Testing procedure and expected results: | 1. Choose CONFIGURATION -> WIRELESS -> Basic in designated device group Add the sub interfaces with different VLAN in LAN
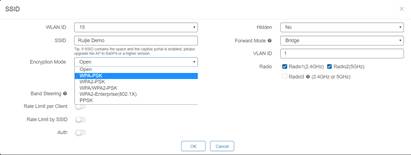
2. Click “+” to create a SSID for the devices under this group
3. In SSID setting page, user can create an SSID and fill in related parameters based on customer requirements.
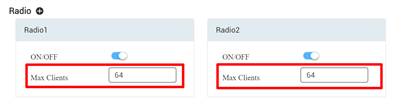
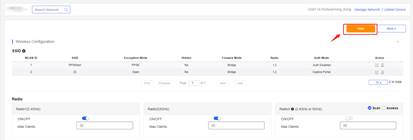
4. Turn on the RF and fill in Max Clients value as required
5. Click Save on the top right corner to save all changes and take effect.
|
| Measured record: | |
| Testing conclusion: |
|
2.2.2 Rate Limit
| Testing project: | Rate Limit |
| Testing purpose: | Rate limit function can limit client’s speed rate as configured. |
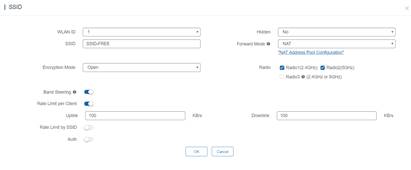
| Testing procedure and expected results: | 1. Choose CONFIGURATION > WIRELESS > Basic.
2. Click “+” under SSID, enter SSID-FREE in the SSID text box, set Rate limit as 100 KB/s, and click Save.
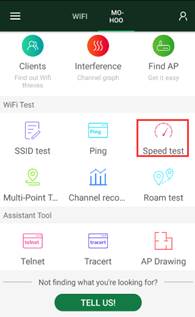
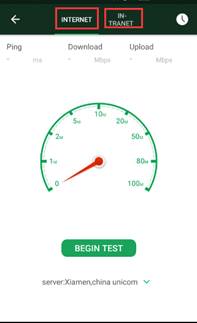
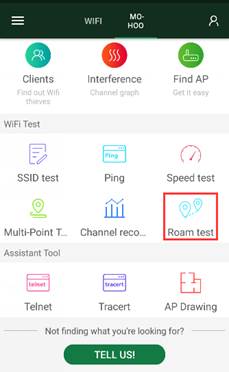
3. Use MOHO to test the speed. Choose Speed test -> INTERNET, Click “BEGIN TEST”.
|
| Measured record: | |
| Testing conclusion: |
|

2.2.3 User Isolation
| Testing project: | User Isolation |
| Testing purpose: | Clients on the same AP with the same SSID are isolated. |
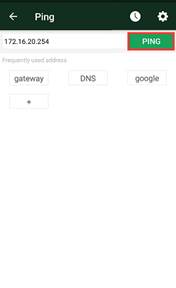
| Testing procedure and expected results: | 1. Choose CONFIGURATION > WIRELESS > Basic.
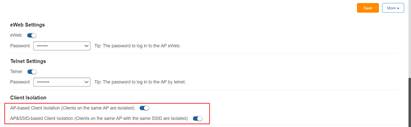
2. Click “+” under SSID to create a new SSID, Enable the Uer Isolation, and click Save.
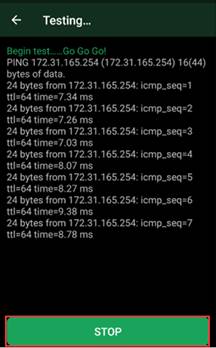
3. Use MOHO to test the result of user isolation. Choose Ping, enter the IP address of other Clients on the same AP with the same SSID, Click “PING”, the client should be isolated and they cannot ping each other successfully.
|
| Measured record: | |
| Testing conclusion: |
|

2.2.4 Whitelist
| Testing project: | Whitelist |
| Testing purpose: | Websites in the whitelist that can be accessed directly without authentication. |
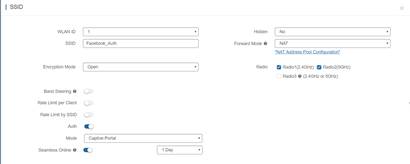
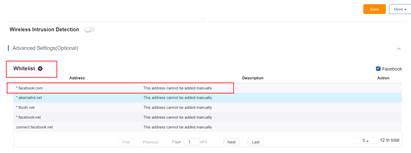
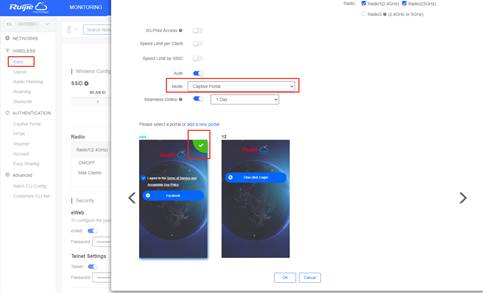
| Testing procedure and expected results: | 1. Choose CONFIGURATION > WIRELESS > Basic.
2. Click “+” under SSID to create a new SSID, choose Auth mode as “Captive Portal”, and choose an inner portal template, and click OK.
3. Enter whitelisted websites, and websites that can be accessed directly without authentication. Add the websites into Whitelist.
4. Connect the SSID and test whether the websites in the whitelist can be accessed without Authentication. |
| Measured record: | |
| Testing conclusion: |
|

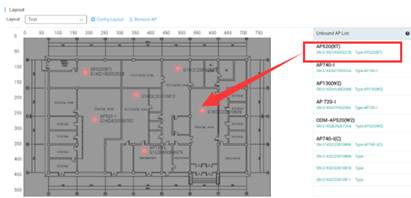
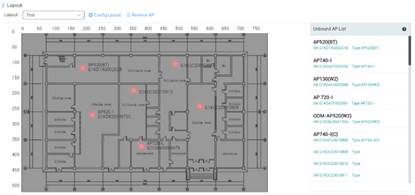
2.2.5 Layout Planning (Optional)
| Testing project: | Layout Planning |
| Testing purpose: | Layout Planning allows user to import floor plan to Ruijie Cloud and binds AP to specific location as deployment. |
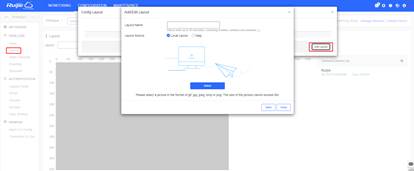
| Testing procedure and expected results: | 1. Choose CONFIGUARTION->Layout and click Config Layout to add floor plan to Ruijie Cloud.
2. Drag the AP from un-bond AP list to floor plan to bind AP to specific location
3. Check the layout planning result.
|
| Measured record: | |
| Testing conclusion: |
|
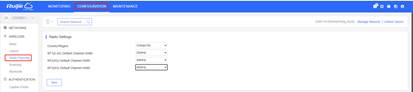
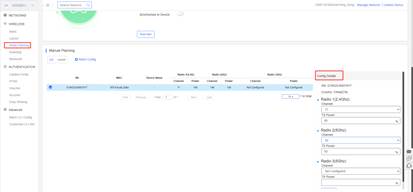
2.2.6 RF Setting(Optional)
| Testing project: | RF Setting |
| Testing purpose: | The RF Setting provides a global setting of wireless country code, bandwidth and intelligent channel/power planning. |
| Testing procedure and expected results: | 1. Click CONFIGUARTION->RF Planning to configure the RF.
2. Select the scan mode and click “Scan Now” to start RF setting automatically.
3. (Optional) Customer can also do manual planning.
4. Check the RF setting result. |
| Measured record: | |
| Testing conclusion: |
|

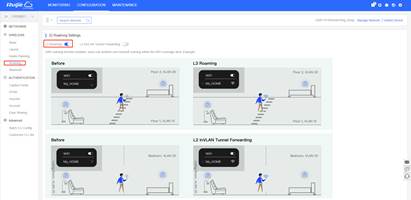
2.2.7 Roaming (Optional)
| Testing project: | Roaming |
| Testing purpose: | Ruijie Cloud roaming function allows STA from AP-1 roaming to AP-2 subnet B seamlessly. User can turn on the layer 3 roaming and layer 2 roaming on Roaming page. |
| Testing procedure and expected results: | 1. Click CONFIGUARTION->WIRELESS ->Roaming, enable the L2 InVLAN Tunnel Forwarding or L3 Roaming.
2. Use MOHO to check the Roaming result. User connect to AP1 first, and then move to the AP2, Check whether the IP stay unchanged and drop package through ping test should be less than 2.
|
| Measured record: | |
| Testing conclusion: |
|
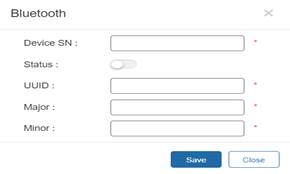
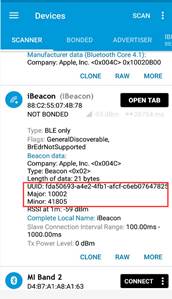
2.2.8 Bluetooth (Optional)
| Testing project: | BlueTooth |
| Testing purpose: | BlueTooth is used for the AP which supports iBeacon feature to broadcast iBeacon signal. |
| Testing procedure and expected results: | 1. Click “Add” to iBeacon parameters to designated AP. Or click “Import” for batch configure.
2. Fill in AP serial number (needs to be online) and iBeacon parameters which are provided by iBeacon service provider.
3. Verify by using “nRF Master Control Pannel” APP on Android phone.
|
| Measured record: | |
| Testing conclusion: |
|

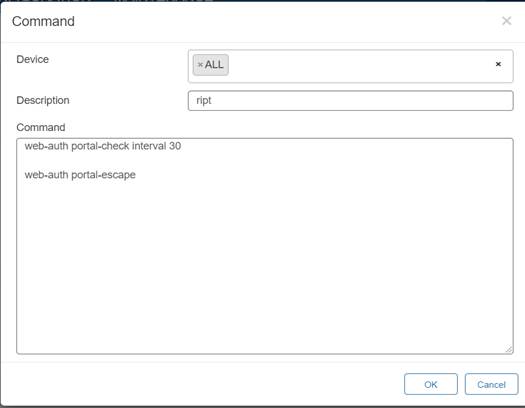
2.2.9 RIPT (Optional)
| Testing project: | RIPT |
| Testing purpose: | If Ruijie Cloud break down, SSID using web authentication will be interrupted and will toggle to Open Authentication automatically by RIPT during disaster. The Web Authentication will resume automatically if Public Cloud is reachable again. |
| Testing procedure and expected results: | 1. Go to CONFIGURATION-> WIRELESS-> Basic, click CLI Command
2. Select Device and execute RIPT command like below, and Click OK to apply it to devices.
3. Disconnect the AP from the Ruijie Cloud, user can still connect to WiFi network via open authentication, when the AP reconnect to Ruijie Cloud, the user can connect to the WiFi network via web authentication again. |
| Measured record: | |
| Testing conclusion: |
|

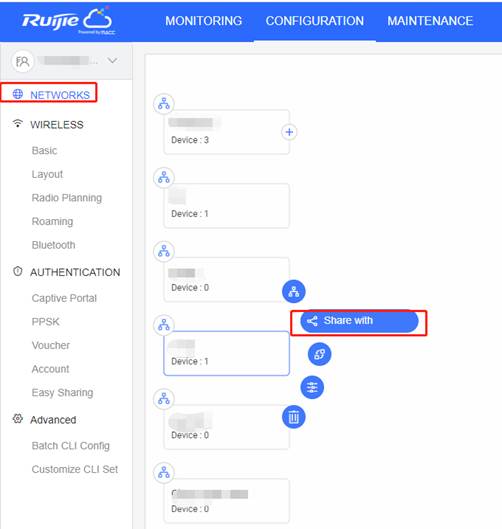
2.2.10 Network Management (Optional)
| Testing project: | Network management, which include Share with network and hand over network. |
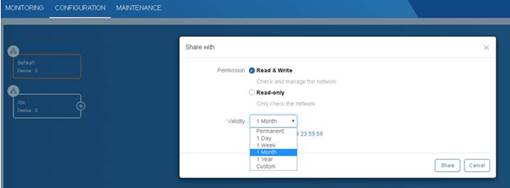
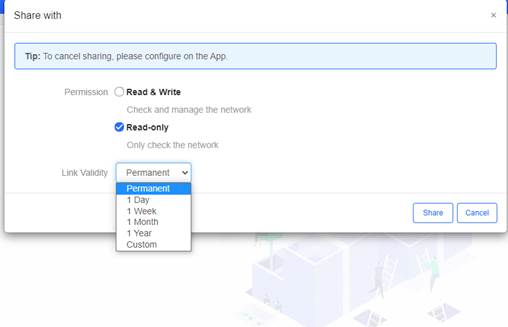
| Testing purpose: | 1. A network can be shared to other users for check and management. You can set the validity so that the network sharing will be canceled after the specified time. 2. The network can be handed over to another tenant. |
| Testing procedure and expected results: | To share with network, The steps are as follow: 1. Select a network and click Share with
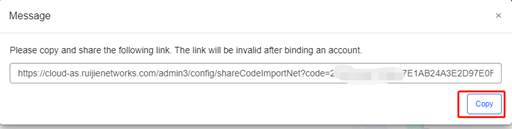
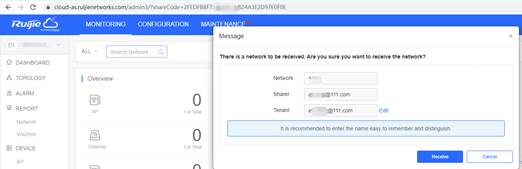
2. Copy the link and send to the receiver. The receiver can visit the URL and log in to receive the network.
3. Click the
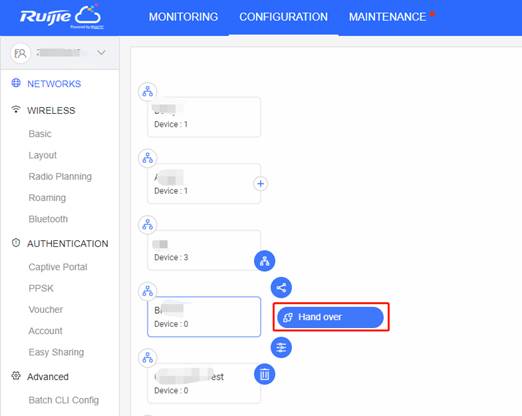
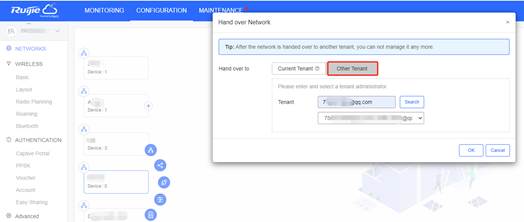
To hand over network, the steps are as follow: 1. Select a network and click Hand over.
2. Enter the Email address of tenant, and click OK. After the receiver takes over the network, you cannot manage the network anymore.
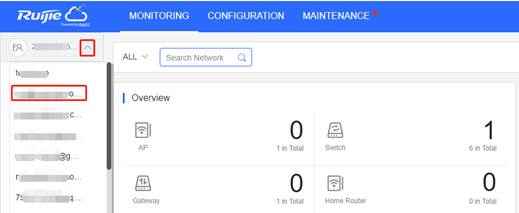
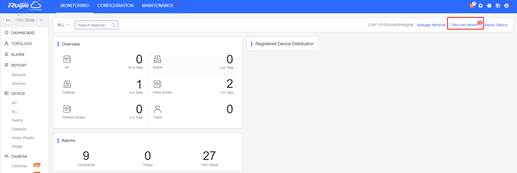
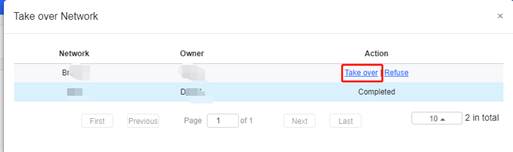
3. As the receiver log in to Ruijie Cloud, an icon is displayed on the upper right corner.
4. Click Take over Network to take over or refuse the network.
|
| Measured record: | |
| Testing conclusion: |
|
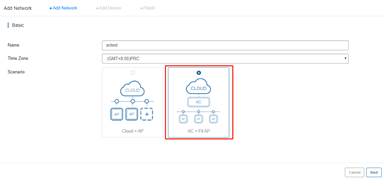
2.2.11 AC Management (Optional)
| Testing project: | AC management, which add AC, login to AC eWeb, restart AC, tunnel config, delete AC, display AP and STA list. |
| Testing purpose: | Testing AC management via Ruijie Cloud, which add AC, login to AC eWeb, restart AC, tunnel config, delete AC, display AP and STA list. |
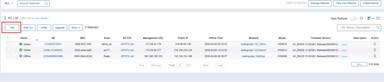
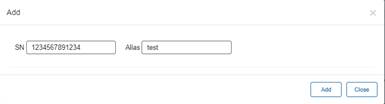
| Testing procedure and expected results: | 1. Add AC network
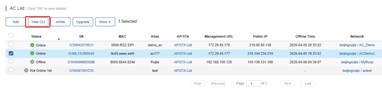
2. Click Add, enter the SN and Alias, and click OK to add an AC to the network. Only one AC can be added to a network.
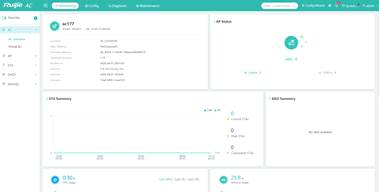
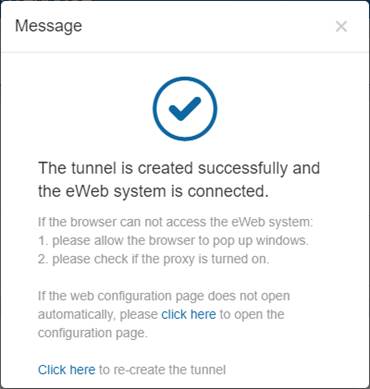
3. Select the device and click eWeb. The system will connect to AC and automatically open the eWeb page in a new window.
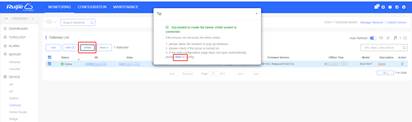
If a tunnel is created successfully but the eWeb page does not automatically open, a message is displayed as below. The user can manually click the link to open the page.
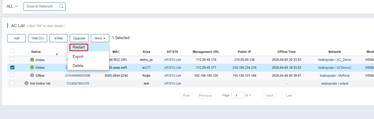
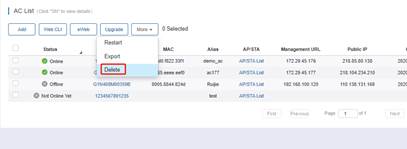
4. Select the device in the AC List, click More > Restart and click OK.
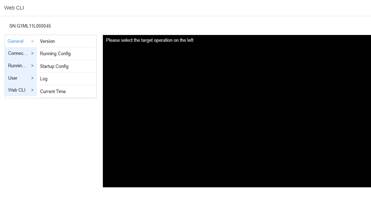
5. Select the device to be managed by CLI command, click Web CLI. The Web CLI page provides commonly-used CLI commands on the left. Click the command, or manually enter the command and click Send. Only one AC can be configured at a time.
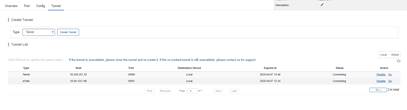
6. The user can create a Web-based tunnel to enter the eWeb system of an AC for more monitoring and management functions. Note: If any security system exists in the network, such as a firewall, the traffic of destination TCP port 10000-10300 should be permitted. Select the device for tunnel management, and click More > Tunnel Config. In the Tunnel Management page, only the Web type can be selected now, and the Tunnel List displays the tunnels already created.
7. Select the device in the AC List, click More > Delete and click OK.
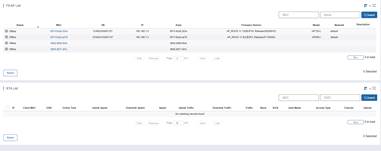
8. Click AP/STA List to display AP and STA list.
|
| Measured record: | |
| Testing conclusion: |
|
2.3 Cloud & App Monitoring
2.3.1 Login EG WEB via Cloud
| Testing project: | EG WEB configuration |
| Testing purpose: | Cloud open EG WEB and access successfully |
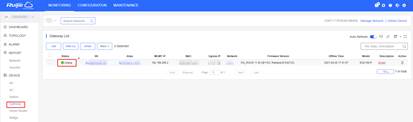
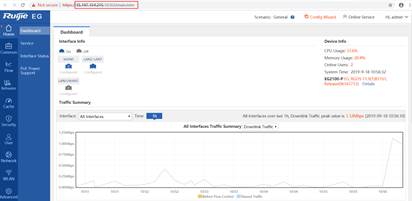
| Testing procedure and expected results: | 1. Make sure the EG online on Cloud.
2. Connect the eWeb in Ruijie Cloud, it will create the tunnel to EG from Ruijie Cloud.
3. Now you can configure the EG by eWeb from Ruijie Cloud.
|
| Measured record: | |
| Testing conclusion: |
|
2.3.2 CloudMonitoring
| Testing project: | Monitoring (Ruijie cloud) |
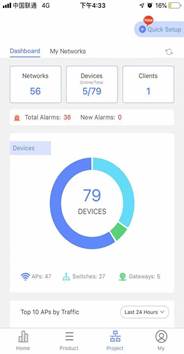
| Testing purpose: | Access Points/Switch/EG overview status can be monitoring on Ruijie Cloud WEB |
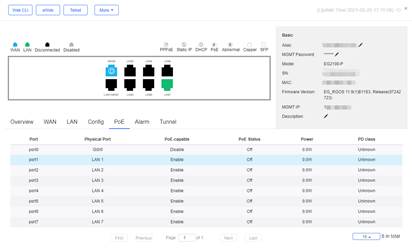
| Testing procedure and expected results: | 1. Ruijie cloud can monitor the device status, including device details, traffic information, current user, interface status and alarm. The CWMP interface can work normally.
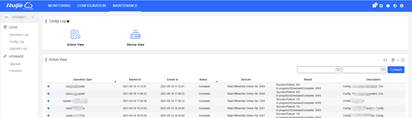
2. Ruijie Cloud support grouping function, report log function is normal
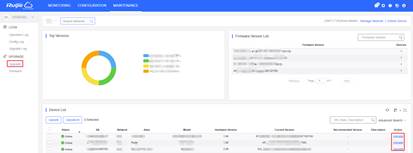
3. Ruijie Cloud can upgrade the device version.
|
| Measured record: | |
| Testing conclusion: |
|

2.3.3 RuijieCloud App Monitoring
| Testing project: | Monitoring (Ruijie cloud APP) |
| Testing purpose: | Ruijie Cloud App (IOS or Android) monitoring EG status (IOS and Android) |
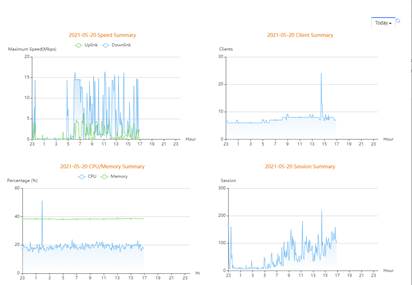
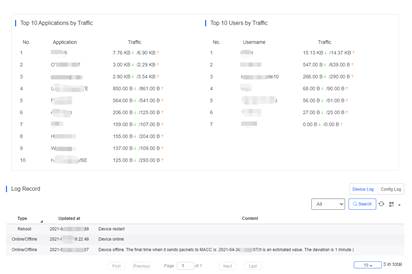
| Testing procedure and expected results: | 1. Ruijie cloud can monitor the device info, system status, client status, applications status and log. 2. Using the Ruijie Cloud APP to add, delete, and configure devices. You can synchronize them under the same account of the Ruijie Cloud. 3. Support IOS or Android version. |
| Measured record: | |
| Testing conclusion: |
|
2.4 Authentication(Cloud & Access Point)
2.4.1 AccountAuthentication
| Testing project: | Account Authentication |
| Testing purpose: | Customer can use account to log in to WiFi network. |
| Testing procedure and expected results: | 1. Make sure the AP is online on Cloud.
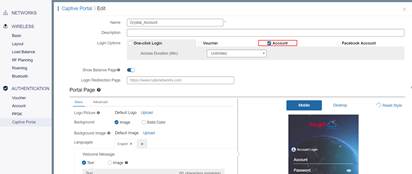
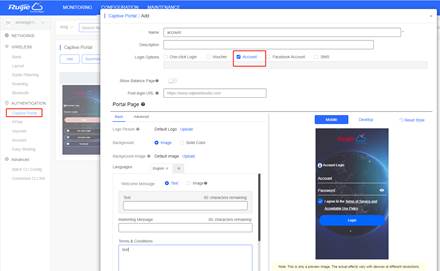
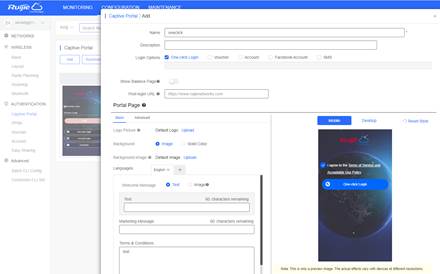
2. Go to CONFIGURATION -> AUTHENTICATION -> Captive Portal, Configure the captive portal template.
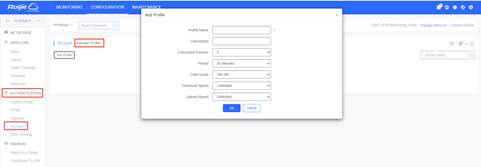
3. Add the account to the group 3.1 Select CONFIGURATION > AUTHENTICATION > Account. 3.2 Select Manage Profile > Add Profile to define an account type for your guests.
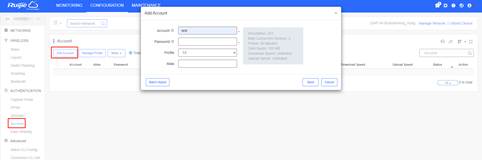
3.3 Click OK to go back to the Account page and click Add Account.
3.4 Enter the account and password, select the package, and click Save.
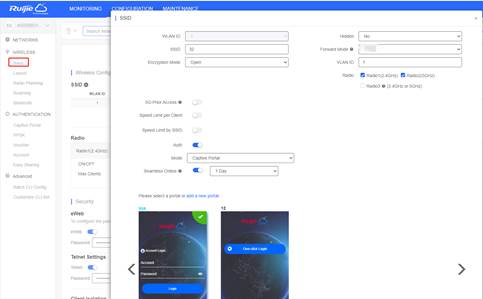
4. Go to CONFIGURATION -> WIRELESS -> Basic, enable Captive Portal in the SSID page, and select a template with Account Authentication.
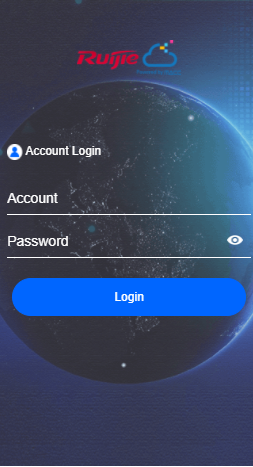
5. Connect the STA to the SSID and log in with the account
|
| Measured record: | |
| Testing conclusion: |
|


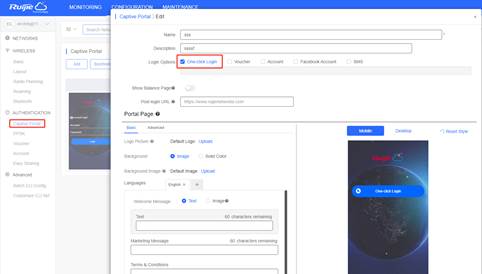
2.4.2 One-ClickAuthentication
| Testing project: | One-Click Authentication |
| Testing purpose: | Customer can use One-Click Authentication to log in the WiFi network. |
| Testing procedure and expected results: | 1. Make sure the AP is online on Cloud.
2. Go to CONFIGURATION -> AUTHENTICATION -> Captive Portal, Configure the captive portal template.
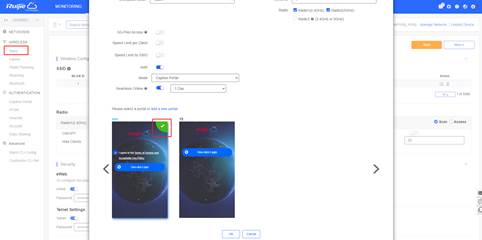
3. Go to CONFIGURATION -> WIRELESS -> Basic, enable Captive Portal in the SSID page, and select a template with One-Click Authentication.
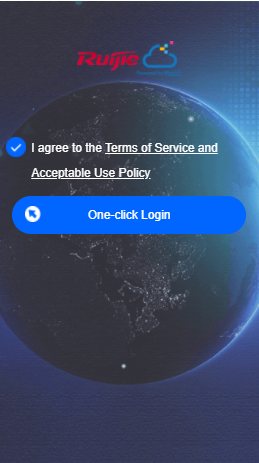
4. Connect the STA to the SSID and log in with One-Click.
|
| Measured record: | |
| Testing conclusion: |
|

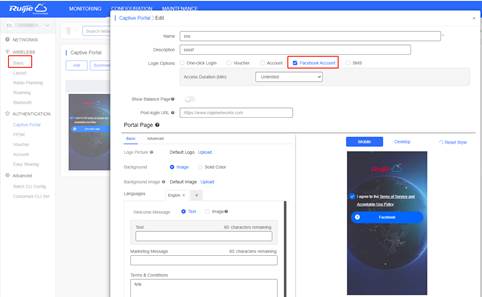
2.4.3 FacebookAccount Authentication
| Testing project: | Facebook Account Authentication |
| Testing purpose: | Customer can use Facebook account login to WiFi network. |
| Testing procedure and expected results: | 1. Make sure the AP is online on Cloud.
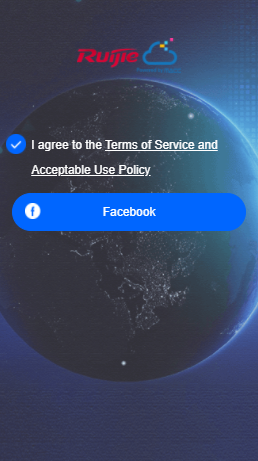
2. Go to CONFIGURATION -> AUTHENTICATION -> Captive Portal, Configure the captive portal template.
3. Go to CONFIGURATION -> WIRELESS -> Basic, enable Captive Portal in the SSID page, and select a template with Facebook Account Authentication.
NOTE: For Facebook social login, you need check on Facebook Whitelist so that clients can access Facebook API before authentication.
4. Connect the STA to the SSID and log in with the Facebook account.
|
| Measured record: | |
| Testing conclusion: |
|


2.4.4 PPSKAuthentication
| Testing project: | PPSK Authentication |
| Testing purpose: | Customer can use PPSK account to log in. |
| Testing procedure and expected results: | 1. Make sure the AP is online on Cloud.
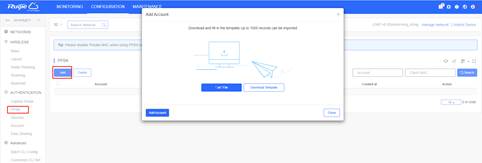
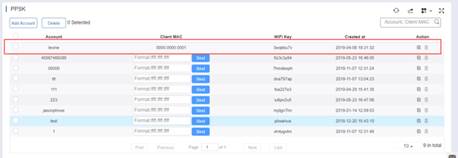
2. Go to CONFIGURATION -> AUTHENTICATION -> PPSK, configure PPSK.
2.1 Select designated group for PPSK authentication.
2.2 Click Add Account to initialize Wi-Fi keys for your guest to login your network.
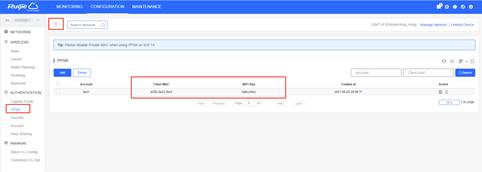
2.3 After Wi-Fi keys are generated, you can view all the keys for your users. And it will be mapped to specific mac address after the user first time login or binding manually.
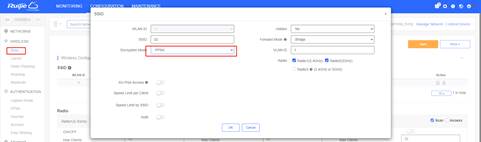
3. Go to CONFIGURATION-> WIRELESS -> Basic and create a PPSK SSID.
4. Connect the STA to the SSID and log in with the PPSK account |
| Measured record: | |
| Testing conclusion: |
|


2.4.5 VoucherAuthentication
| Testing project: | Voucher Authentication |
| Testing purpose: | Voucher authentication on Ruijie Cloud allows you to charge users for wireless network access using access codes. Concurrent users, time period and data quota limit can be customized and offer to your guests.
Customer can use voucher account to log in by portal WiFi (SSID) |
| Testing procedure and expected results: | 1. Make sure the AP is online on Cloud.
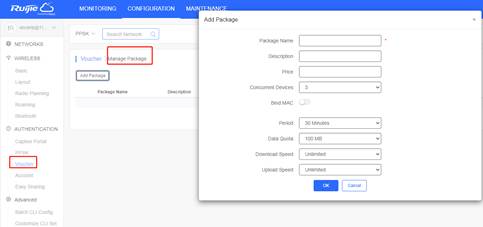
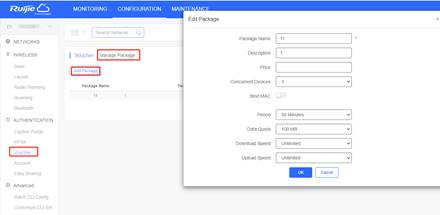
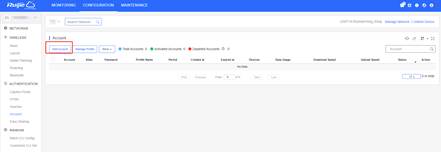
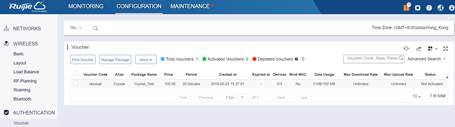
2. Go to CONFIGURATION -> AUTHENTICATION -> Voucher, configure Voucher. 2.1 Click Manage Package and Add Package to define a voucher type for your guests.
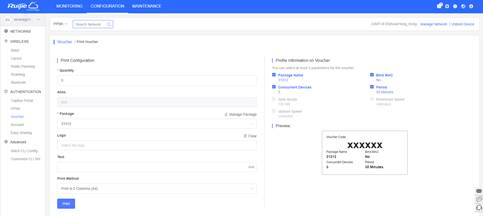
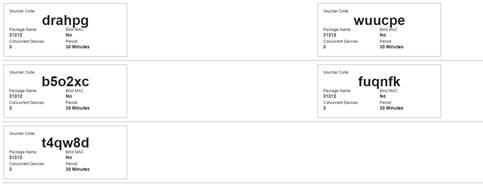
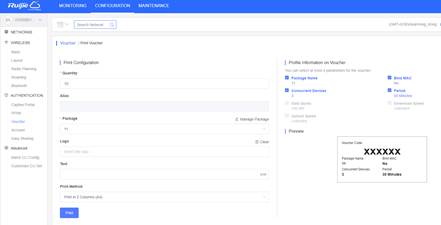
2.2 Go back to voucher page and click Print Voucher
2.3 Select the way you want to print voucher codes and fill the quantity if you are selecting Multiple Vouchers. And then click “Print”.
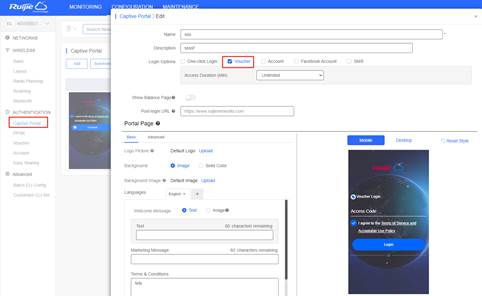
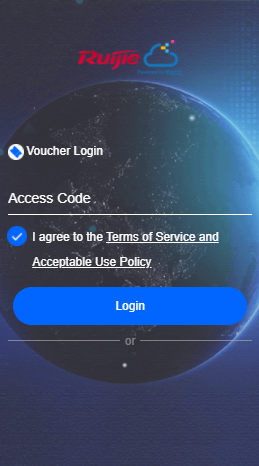
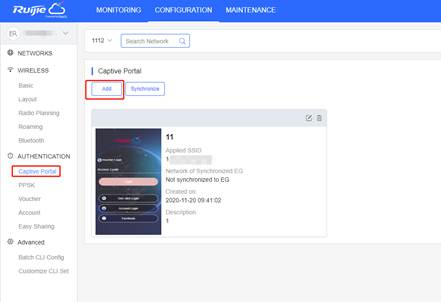
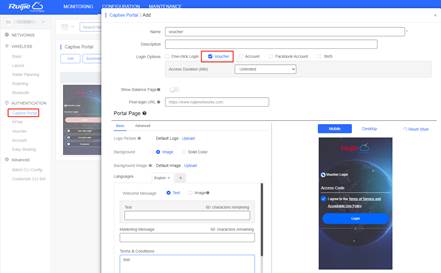
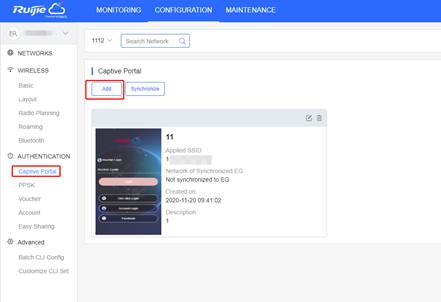
3. Go to CONFIGURATION-> AUTHENTICATION-> Captive Portal, add a new Captive Portal, and set the login options as Voucher.
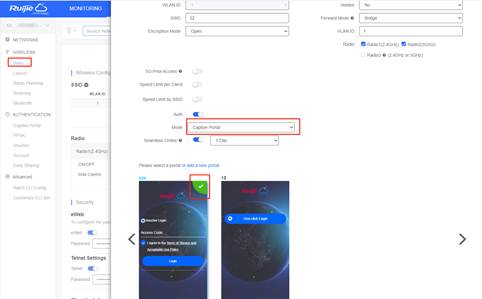
4. Create an SSID, and choose the mode as Captive Portal on CONFIGURATION->WIRELESS->Basic.
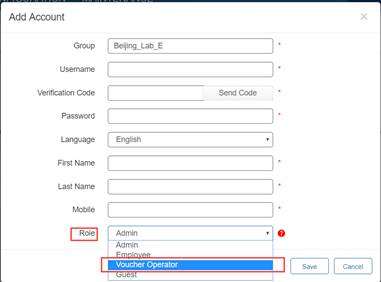
5. (Optional) Click Sub Account on top right corner and create an account as voucher operator role who can only view the voucher page.
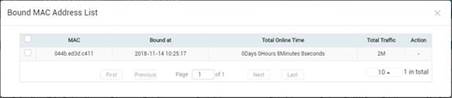
6. (Optional) Bind/Unbind MAC If Bind MAC is enabled for the package, the voucher code used by a device will be bound with its MAC address. The number of bound MAC can be set in Max Concurrent Devices. When the Status is Activated or Depleted, you can click
7. Connect the STA to the SSID and log in with the Voucher account
|
| Measured record: | |
| Testing conclusion: |
|


2.5 Authentication Acceleration (EG Offload)
2.5.1 Voucher Login with EG local auth
| Testing project: | Voucher Login with EG local auth |
| Testing purpose: | Use Cloud Voucher Code to log in with Portal WiFi (SSID) |
| Testing procedure and expected results: | 1. Have the EG go online on the Ruijie Cloud, and create voucher, account on Ruijie Cloud.
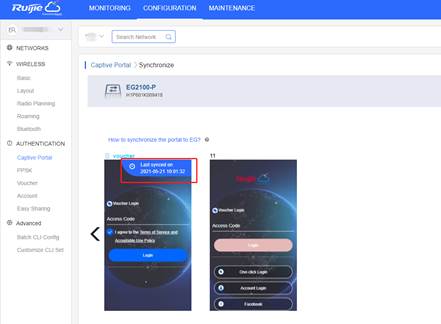
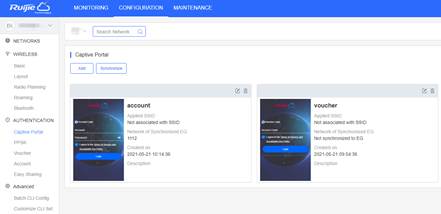
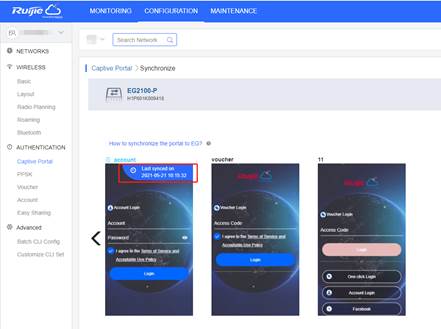
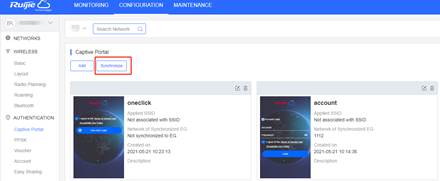
2. Go to Ruijie Cloud, Click Configuration -> AUTHENTICATION -> Captive Portal, select the group and add the captive portal template, select the Login Option as “Voucher”.
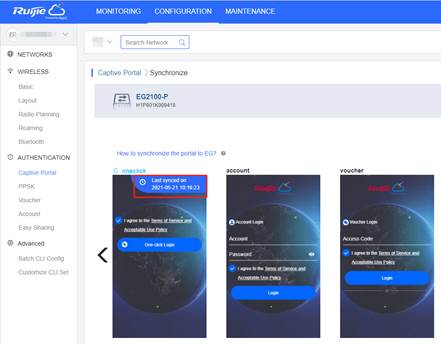
3. Click Synchronize and Synchronize the captive portal from Ruijie Cloud to gateway.
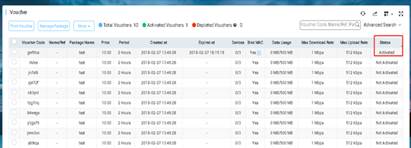
4. EG is installed and online on the Ruijie Cloud, the Ruijie Cloud operates the voucher user (addition and deletion), which can be correctly synchronized to the EG. Create the package
Print voucher
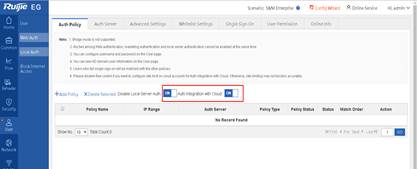
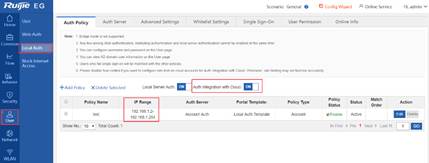
Enable the auth integration with Cloud
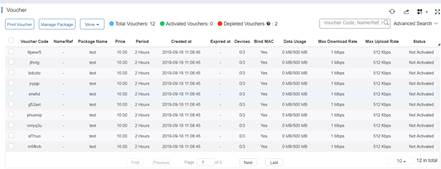
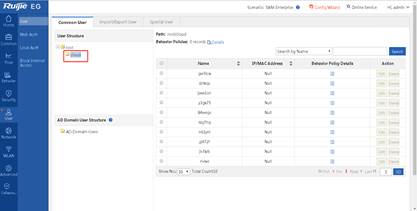
Show the users synced from Cloud
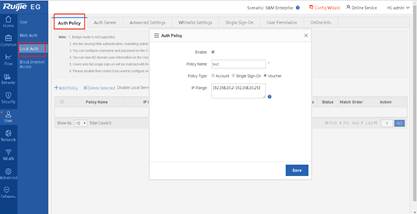
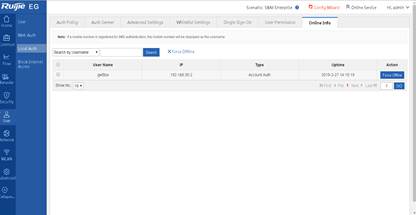
5. Enable the local authentication on EG, The users can connect to external network by voucher authentication Add the authentication IP range
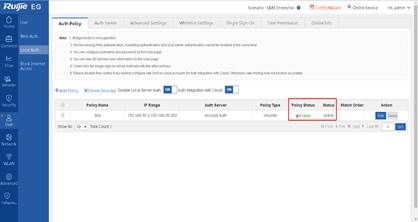
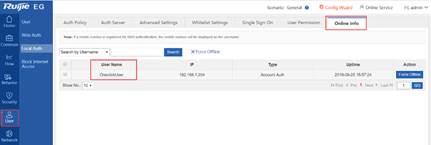
Client connect the network, Show the online info
This voucher status is Actived
|
| Measured record: | |
| Testing conclusion: |
|


2.5.2 Account Login with EG localauth
| Testing project: | Account login |
| Testing purpose: | Use account to log in with EG local auth |
| Testing procedure and expected results: | 1. Have the EG go online on the Ruijie Cloud.
2. Go to Ruijie Cloud, Click Configuration -> AUTHENTICATION -> Captive Portal, select the group and add the captive portal template, select the Login Option as “Account”.
3. Click Synchronize and Synchronize the captive portal from Ruijie Cloud to gateway.
4. Make the EG go online on the Ruijie Cloud, and add and delete the account user, which should be synchronized to the EG.
5. Login to EG, enable the Auth Integration with Cloud. 6. Enable the Local Server Auth on EG, so that the users can connect to external network by account authentication. 7. Check the authentication status on Ruijie Cloud, this account status is activated on cloud after user login |
| Measured record: | |
| Testing conclusion: |
|


2.5.3 One-click login with EG local auth
| Testing project: | One-click login |
| Testing purpose: | Use account to log in with EG local auth |
| Testing procedure and expected results: | 1. Have the EG go online on the Ruijie Cloud.
2. Go to Ruijie Cloud, Click Configuration -> AUTHENTICATION -> Captive Portal, select the group and add the captive portal template, select the Login Option as “One-click Login”.
3. Click Synchronize and Synchronize the captive portal from Ruijie Cloud to gateway.
4. Login to EG, enable the Auth Integration with Cloud.
5. Enable the Local Server Auth on EG so that the user can connect to external network by one-click authentication.
6. Check the authentication status on Ruijie Cloud, this user’s status is activated on EG after user login
|
| Measured record: | |
| Testing conclusion: |
|


2.5.4 SeamlessAuthentication
| Testing project: | Seamless |
| Testing purpose: | After first successful login authentication, the second time STAs access to the network will not need authentication again. |
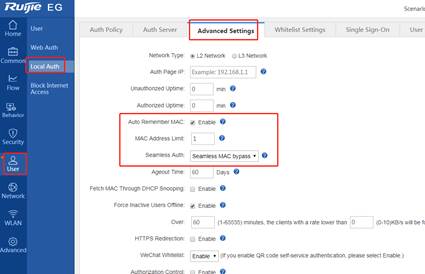
| Testing procedure and expected results: | 1. EG is installed and online on the Ruijie Cloud, the Ruijie Cloud operates the Voucher user (addition and deletion), which can be correctly synchronized to the EG.
2. Enable and disable seamless on EG. Close means disable seamless, seamless MAC bypass means enable seamless with MAC
3. Test the seamless with different STAs, record the result. First time STA login to online, then next time STA come back the network (or you can kick out the user on EG), he will be online automatically without authentication. |
| Measured record: | |
| Testing conclusion: |
|

 Thank you. We will inform you of our response as soon as possible.